You don’t need an underground bunker to prepare for the worst—well, maybe the worst—but for immediate emergencies, your iPhone can be a lifesaver. From calling for roadside assistance to suspending Apple Pay if your phone is stolen, Apple’s ever-improving safety features can better protect your safety and your privacy.
Read on for a look at six safety features you likely haven’t used and (in some cases) hopefully never have to.
Roadside Assistance
Texting Roadside Assistance
Image: Apple
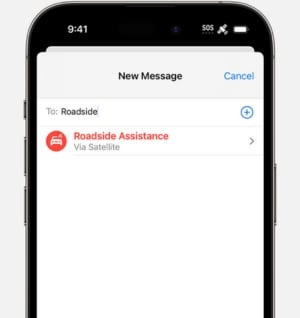
Stuck in the boonies with a flat tire? As long as you have an iPhone 14/14 Pro or iPhone 15/15 Pro, Apple's Roadside Assistance via Satellite can help. In the absence of cell service or Wi-Fi, you can alert AAA or emergency services thanks to satellite connectivity, so long as you are outside with a clear view of the sky and horizon.
Introduced as part of the iPhone 15 launch, Roadside Assistance is free for two years after activating your phone. Apple has yet to disclose the cost of the feature after that.
How to use Roadside Assistance
Road Assistance can help you out in a crunch, here’s how you can use it:
- Open up a new message like you’re going to text a friend.
- Type “Roadside” in the address field, and the Roadside Assistance feature should appear.
- Select “Roadside Assistance Via Satellite”.
- Follow the step-by-step onscreen instructions. Your phone will then connect to a satellite, and you can request help. (Note: this process can be a tad slow. It’s connecting to space, after all!)
Additionally, if you try to call 911 but your call doesn’t go through, you will be asked if you want to text emergency services or get roadside assistance via a satellite connection.
Medical ID
Medical ID profile
Image: Apple
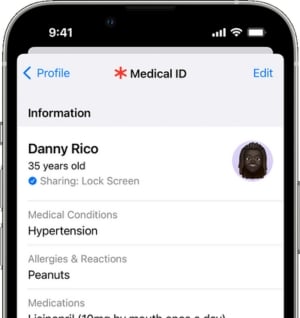
Most of us don’t wear medical ID bracelets, but we do have our phones in our pockets or handbags. With Apple’s Medical ID, you can keep important health information on you at all times, should the worst happen. Even if your phone is locked, first responders can open your medical ID for access to important health information such as ongoing medical conditions, medications, and allergies.
Medical ID is available on iOS systems 13.5 and later and can be found in your Health app. It’s worth creating a profile if only to add emergency contacts. This way, your loved ones can be notified if something goes amiss.
How to set up your Medical ID
Setting up your Medical ID is quick and simple. To begin:
- Find your Health app.
- Select Summary (the heart in the bottom left corner)
- Tap on your profile picture.
- Choose Medical ID and then Edit.
From here, you can add as much or as little as you want. The more you add, the more informed your care team will be in an emergency.
Get the latest iOS software to optimize safety
Ignoring that software update notification? Don’t—at least, not if you want to get the most from Apple’s safety features. With every software update come new and improved features you won’t want to miss out on. Many features mentioned here require that your iPhone run on iOS 16 or newer.
To update to the latest iOS, go to Settings > General > Software Update. Turn on Automatic Updates to keep your phone updated with the latest software. Check out our iOS updating guide for step-by-step instructions.Crash Detection
Crash Detection display
Image: Apple
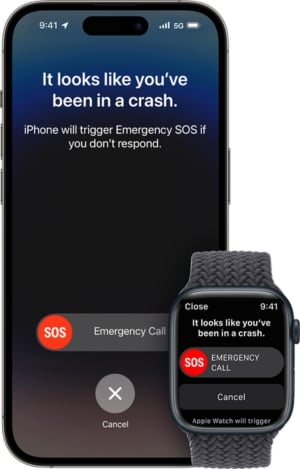
God forbid you’re in an accident, but what are safety features for, if not worst-case scenarios? With Apple’s Crash Detection, your iPhone or Apple Watch can alert emergency services if you’ve been in a severe car accident. This feature works on all models of the iPhone 14 and newer so long as the phone runs on iOS 16 or later.
So, how does your iPhone (and Apple watch) detect an accident? Without getting too technical, these devices have sensors that detect motion and speed. iPhone 14 and newer can detect a G-force up to 256 Gs. For perspective, a bad car crash is around 100 Gs or more. In addition, your phone’s microphone can detect loud sounds (such as those of a crash), and its barometer can determine changes in air pressure, as in a deployed airbag.
While there have been some false alarms on ski slopes and rollercoasters (you can imagine), the feature has proved effective in many cases.How does Crash Detection work?
You don’t need to set up Crash Detection. If your iPhone is capable, it will work automatically. Here is what will happen if an accident is detected:
- Your iPhone or Apple Watch will sound an alarm, and an alert will appear on the screen.
- Your iPhone will read the alert aloud and display an Emergency Call slider.
- If you cannot proceed with the emergency call yourself, your phone or watch will automatically call emergency services after 20 seconds.
- At this point, your device will alert your emergency contacts by sending them your location and letting them know you’ve been in an accident. (This is another reason to add emergency contacts to your Medical ID.)
- Speaking of your Medical ID, if you have one, your device will display a Medical ID slider that first responders can use to view your health profile.
Stolen Device Protection
Turn on Stolen Device Protection
Image: Alissa Bird | WhistleOut
According to the FCC (Federal Communications Commission), one in every 10 Americans is a victim of a smartphone phone theft, myself included (London airport ladies' restroom, 2017. RIP iPhone 7). With more and more of us using autofill and Apple Pay, protecting our phones is more critical than ever.
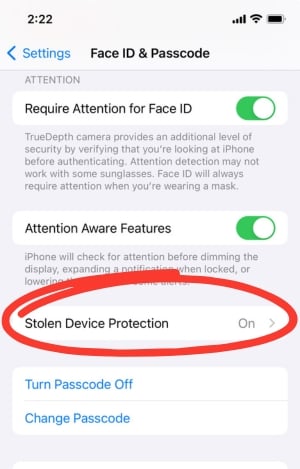
Enter Apple’s Stolen Device Protection, available with iOS 17.3. When enabled, your device will require Face ID, fingerprint authentication, or a one-hour security delay to perform sensitive actions such as changing your phone’s passcode, turning off Find My, or making changes to your Apple ID when your iPhone is away from familiar locations like work or home. This way, even if someone snatches your device, they won’t have access to critical information.
How to set up Stolen Device Protection
Protecting your phone is just a toggle away. Here’s how to enable Stolen Device Protection on your iPhone:
- In your Settings select Face ID & Passcode.
- Put in your passcode.
- Find Stolen Device Protection and toggle it on.
You can test this feature by attempting to turn off your Stolen Device Protection next time you are away from your home or workplace. Your phone will initiate a Face ID check and alert you to a one-hour security delay.
What should I do if someone steals my iPhone?
If you suspect your phone has been stolen, sign in to iCloud.com/find as soon as you can and select the Find Devices option. From there:
- Choose your device and use the map to track its location (if possible). If you see it, contact the police rather than confronting the culprit yourself.
- Mark your device as Lost and follow the instructions for leaving a phone number and message in the event a good samaritan has your phone.
- Choose Activate to lock your phone with the passcode you have set, or make a passcode if you haven’t used one before.
Once you mark your phone as Lost, Apple Pay will suspend, and your phone will lock. If you never recover your phone (my condolences), it’s a good idea to update your Apple ID password and remove your phone from Apple ID-trusted devices.
Check In on iPhone
Apple's Check In feature
Image: Apple
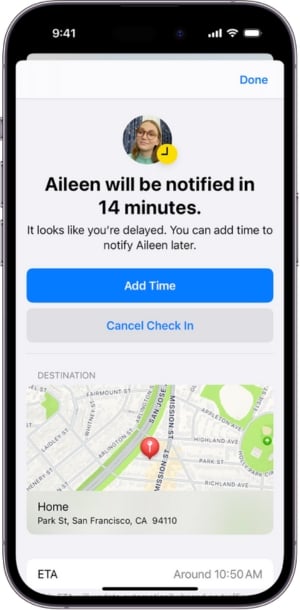
Planning a meet-up with the cutie you met on Tinder? Awesome, but maybe send your roommate a Check in, just in case. Apple’s Check In feature, available with iOS 17 and newer, informs your loved ones when you’ve arrived safely at your destination and alerts them to any unexpected change in plans.
With Check In, your phone will send an estimated ETA to your recipient based on your mode of travel (walking, biking, driving, etc) so they know when to expect you or when to worry. If you don’t arrive at your destination or don’t respond to Check In prompts within 15 minutes of your expected arrival time, your iPhone will alert your loved one of your location, battery life, and cellular signal. It will notify your recipient if your phone is offline or initiates an emergency call.
How to use Check In
You can customize your Check In in several ways, but first, you will want to initiate a session. To do this:
- Open up a new text message and address it to your desired Check In recipient.
- Tap the + (more) button located near the message field.
- Select Check In.
- Select the data you want to share: Limited data (location, battery levels, network signal) or Full data (all data collected during your route, the location where your phone was last unlocked, and more).
You will then have the choice between two types of check-ins:
-
When I Arrive tracks your journey and gives your recipient an ETA. It will notify them if your phone isn’t moving for a period of time or if you don’t arrive within the estimated 15-minute window. It will also automatically notify them when you arrive at your destination.
-
After a Timer allows you to set an intended time for your outing and alerts your recipient to your whereabouts, battery life, etc, if you don’t end the timer after the allotted time frame. This option maintains a bit more of your privacy while also keeping you safe.
You can also take the following actions:
- Add time to your Check In. To do this, open your Check In message, select Details > Add Time, and choose from the options listed
- Cancel a Check In by opening your Check In message, selecting Details > Cancel Check In > Confirm.
You don’t need to be a worry-wort (or my fearful grandmother) to give this feature a try.
Safety Check
Enabling Safety Check
Image: Apple
Whether you know it or not, you are likely sharing information, with many of your iPhone contacts, such as your location, photos, or notes. With Safety Check, you can see exactly which devices and people have access to your information and can stop sharing if need be. Whether you’re coming out of a toxic relationship or setting new boundaries with a family member, Safety Check can keep your personal data safe from others.
So long as you have an Apple ID with two-factor authentication and iOS 16 or later, you can use Safety Check to initiate an Emergency Reset and to manage your sharing settings.How to Initiate an Emergency Reset
If you need immediate privacy from both apps and people, you can initiate an Emergency Reset. Think of this as the nuclear option, as it blocks all shared access to your personal information, including shared calendars, photos, notes, and more. In addition, you’ll have the chance to review your Apple ID settings and your emergency contacts, making any changes you feel necessary.
To initiate an Emergency Reset:
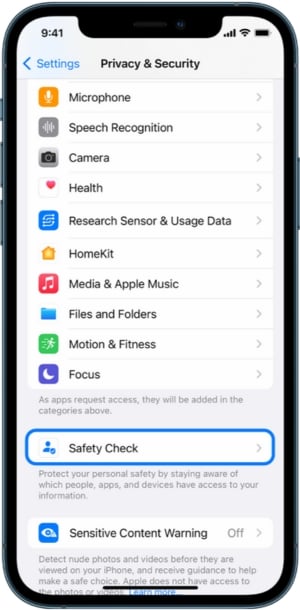
- Go to your Settings > Privacy & Security > Safety Check
- Tap Emergency Reset
- Read the disclaimer and then select Start Emergency Reset
Keep in mind that your contacts might know that you have revoked sharing privileges.
How to manage your sharing and access
Customizing your sharing access
Image: Alissa Bird | WhistleOut
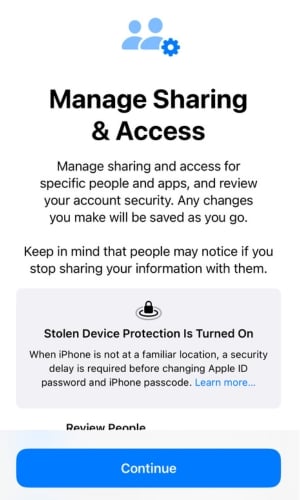
Safety Check’s access management feature tells you what information you’re sharing and with whom. To review and customize these settings:
- Find your Settings, then select Privacy & Security > Safety Check.
- Choose Manage Sharing & Access.
- Read the disclaimer and select Continue.
- Choose between People and Infomation to review your sharing access
- In People, tap on a contact to see what you’re sharing with them. Select any information you wish to keep private and tap Stop Sharing. Do this for as many contacts as you wish.
- Alternatively, you return to the main screen and select Information to stop sharing whole applications, like photos, at once.
Other iPhone safety features worth knowing about
If you want to protect yourself and your iPhone further, check out these other safety features.
-
Emergency SOS calls: Quickly contact emergency personnel.
- To initiate an Emergency SOS call on iPhone 8s and later, hold down the side button and one volume button until the emergency slider appears. Use the slider to proceed with a call or continue holding down the buttons until a countdown begins, an alert sounds, and the call connects with emergency personnel.
- Find My: Locate your phone in the event it’s lost or stolen. Not sure how to set this up? We have a guide for that.
- Number blocking: Whether it's a spammer looking to swindle you or an ex who can’t stay away, our comprehensive guide teaches you how to block numbers on your iPhone.
Upgrade your iPhone for the latest safety features
Unfortunately, many of the latest safety features are only available for iPhone 14 and later. Thankfully, upgrading your device doesn’t have to mean breaking the bank. While the iPhone 15 has a slightly better camera and overall performance, we suggest saving some cash and sticking with the iPhone 14 or 14 Pro for a comparable iPhone experience. You can also check out our iPhone 14 vs 15 review for a more detailed comparison.
In addition, if you’re looking for additional savings, visit our guides on iPhone deals. We update these regularly with the latest savings from the big three carriers: AT&T, T-Mobile, and Verizon.
iPhone 17e 256GB
- 6.1 inch display
- Rear Camera: 48MP
- Front Camera: 12MP

iPhone 17e 512GB
- 6.1 inch display
- Rear Camera: 48MP
- Front Camera: 12MP

iPhone 17 256GB
- 6.3 inch display
- Rear Cameras: 48MP, 48MP
- Front Camera: 18MP
iPhone Air 256GB
- 6.5 inch display
- Rear Camera: 48MP
- Front Camera: 18MP

iPhone 17 512GB
- 6.3 inch display
- Rear Cameras: 48MP, 48MP
- Front Camera: 18MP
Alissa Bird
Staff Writer

Find a better phone plan
Thousands of cell phone plans unpacked. All the facts. No surprises.


.jpg?w=280&h=280&usm=20&usmrad=0.8&fit=crop "How to Switch to TracFone and BYOP")


")